
The spark
Since I was young I’ve been playing with wires, batteries, and small light bulbs — model electric trains, home-brew circuits, the usual obsessions of a kid who couldn’t leave a battery pack alone. That curiosity turned into an electronics education, and later into doing all the electrical wiring for my own office myself.
In June 2023 that curiosity found a professional outlet too. I started an Energy team at a large logistics company in the Netherlands, where for the past three years we’ve built custom energy services: retrieving 15-minute measurements from meter data companies, a custom CPO and CSMS for tailored EV charging, an OCPI client so external drivers can use our charge points, and a custom EMSP for the company’s own charge tokens. More recently we’ve been diving into solar inverters — controlling them via the SunSpec protocol to prevent grid export — and into how to control batteries at scale.
Somewhere in the middle of all that, working on smart energy storage systems for this customer, I realized I wanted to actually understand the electrical installation behind an ESS — not just the software controlling it. And there’s no better way to learn something like this than to build it yourself.
Why build my own
Before deciding what to buy, I wrote down what I actually needed:
- Run off-grid for multiple days, with the option to go fully independent once I have more solar capacity.
- Bridge grid outages and short “glitches” so my servers, network storage, and other always-on systems never notice a blip.
- Leave room for future expansion — a charge point, a heat pump.
- Stay open: I want to monitor and eventually control the whole system myself, not be locked into a vendor’s app.
That last point mattered a lot. A sealed commercial battery wall would have solved the first three requirements easily enough, but not the fourth — and the fourth is arguably the whole reason I wanted to do this at all.
The research phase
Before I ordered or built anything, a good chunk of time went into simply figuring things out. Who could actually supply and support a system at this scale, and where to find them. Which components would actually fit together into a coherent system, and why one option made more sense than another. How much battery capacity actually made sense, versus what would just be excess weight and cost. How much power the inverters needed to be able to deliver and absorb to cover the loads I had in mind, now and later. How thick the wiring needed to be for the currents involved, and how that changed once we factored in the distance between the shed and the house. What all of this meant for the fuse box in the house itself — what would need to change there to connect a system like this safely and correctly. Whether the battery management systems I was considering would actually talk to the rest of the system the way I needed them to, and what that would mean with multiple battery packs running in parallel.
The shed went through the same kind of process before a single panel went up: how much insulation thickness actually mattered, how much the roof and wall color would affect interior temperature, whether a green roof was worth the added weight and cost versus a simpler alternative, and what kind of heating, if any, the battery room would need to stay stable through winter.
None of this was glamorous, and most of it never shows up in the finished system — but it’s where most of the actual decisions got made.
Buying vs. DIY — and choosing Victron
In the Netherlands there are several companies — Off-grid Centrum, Helion Energie, and others — offering DIY energy storage kits complete with batteries, inverters, manuals, and support. They were a great starting point for figuring out what a system like this actually needs.
In the end, I decided to source and design everything myself, using those kits purely as inspiration rather than buying one outright.
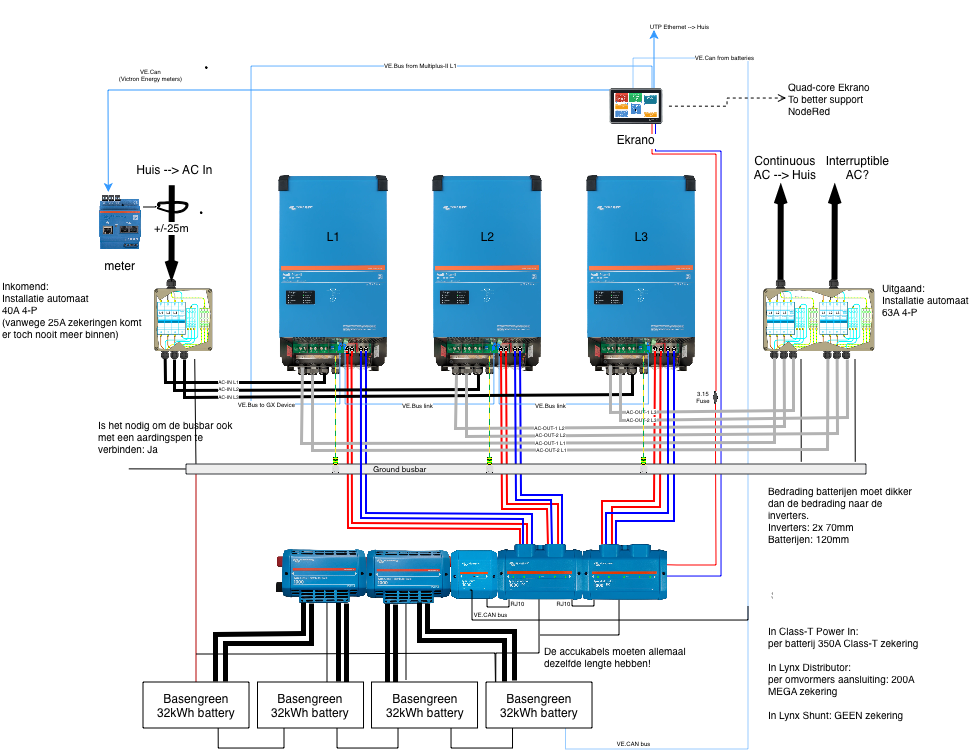
For the inverters, Victron was an easy choice. It’s a Dutch company building excellent inverters used worldwide, and — crucially for me — their ecosystem is genuinely open. For the control unit I picked the Ekrano GX over the more common Cerbo GX: the Ekrano’s quad-core CPU has enough headroom to run Node-RED alongside the standard Victron software, which opens the door to a lot more customization down the line.
All Victron components were ordered from Acculaders.nl which were also very helpful with validating the schematic and selecting the right products.
Sizing the batteries
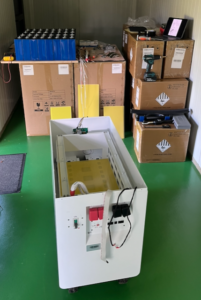
For batteries I settled on Basengreen DIY LiFePO4 kits. I originally planned to order the 16kWh kit, but by the time I was ready to buy, Basengreen had just released a 32kWh version. Doubling the capacity cost only about 25% more than the 16kWh kit — so instead of buying six 16kWh kits to reach my planned 96kWh, I bought four 32kWh kits and ended up with 128kWh total for less money.
Designing the DC system
LiFePO4 cells can deliver an extremely high short-circuit discharge current — well over 10,000A — so protecting the DC side properly was non-negotiable. Each battery pack is protected by its own Class-T fuse, sized above the BMS’s 300A limit, before it reaches the shared DC bus.
That bus is built from Victron’s Lynx M10 range: a Lynx Class-T Power In, a Lynx Shunt VE.Can M10, and two Lynx Distributors — with physical space reserved for a third once I expand. Each of the three MultiPlus-II inverters connects to the bus via a double pair of 70mm² cables, protected by its own pair of 200A MEGA fuses. The batteries themselves connect to the main busbar with 120mm² cable.
Victron’s “Wiring Unlimited” document was an enormous help here — it’s a genuinely good reference for cable sizing, fusing, and topology, and I leaned on it heavily while working through several of Victron’s example schematics to arrive at my own design.
Following NEN 1010 — and PGS 37-1 by choice
For the electrical installation itself, I’m following the Dutch NEN 1010 standard, which is simply the baseline for safe electrical work here.
On top of that, I’m also trying to comply with PGS 37-1 — the Dutch guideline for safe storage and use of lithium batteries, which becomes mandatory for companies in 2027. It doesn’t apply to me as a private individual, and I could safely ignore it. But the extra measures it calls for — things like fire and CO detection tied into the system, and a ventilation strategy specifically for battery off-gassing — exist because LiFePO4 cells, while much safer than other lithium chemistries, can still fail in ways that produce heat, smoke, or gas if something goes seriously wrong. Most of PGS 37-1’s requirements are cheap and straightforward to implement now, while the walls are still open, so treating it as a design target rather than a compliance burden felt like the obvious call.
Building the shed
We already had a self-built shed in the garden, and it would have technically fit the system — but I wasn’t willing to put 800kg of batteries into a structure I didn’t fully trust for the next few years. So I went looking for something better.
After a fair amount of searching, we settled on a prefab shed from Isoblox, built with Falk sandwich panels. Isoblox can put one of these up in a single day, and the 10cm-thick panels give it a solid insulation value — important for keeping the battery room within a sensible temperature range year-round.
The shed sits on a 15cm concrete foundation. To get a clean, durable floor inside, I ordered an epoxy floor kit from Epoxywinkel.nl and coated it myself. It finished just before our holiday, which worked out well — it had a couple of weeks to cure properly before I started building anything on top of it.
Getting the batteries in
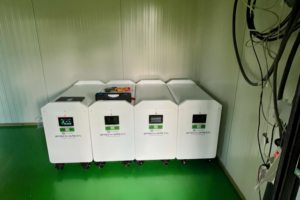
After the holidays, it was time to move 800kg of lithium batteries and 200kg of battery cases into the new shed and assemble the DIY kits. All four units are now built and working.
Where things stand now
Right now I’m framing a dedicated room inside the shed for the batteries — adding insulation and reinforcing the wall so it can support the three 50kg inverters that will eventually hang there. I’m also adding wiring inside the frame for the lights in the shed and additional outlets. I’m planning to use 2 groups to separate the lights and outlets for the rest of the shed with devices and outlets needed in the battery-room.
There’s still a lot to cover: the battery room build itself, fire and CO detection, ventilation control, the AC wiring back to the house, and getting everything commissioned and monitored. I’ll get into all of that in the next post.